To draw a goldfish, start with a basic oval shape for the body, then add fins and details. Use smooth, flowing lines to capture its natural movement.
Drawing a goldfish can be a fun and rewarding activity. These graceful creatures offer a perfect subject for artists of all skill levels. Begin by observing a real goldfish or reference images to understand its anatomy. Notice the streamlined body, flowing fins, and distinctive tail.
Use a light hand to sketch the basic shapes, ensuring the proportions are accurate. Gradually add details such as the eyes, scales, and fin textures. Experiment with different shading techniques to give your goldfish a realistic appearance. Practice regularly to refine your skills and create more lifelike drawings. Whether for a hobby or improving your artistic abilities, drawing a goldfish can be a delightful experience.
Introduction To Goldfish Drawing
Drawing a goldfish can be a fun and rewarding activity. It helps you develop your artistic skills and offers a chance to understand more about these beautiful creatures. In this guide, we will explore the steps to draw a goldfish, starting with the basics.
Why Start With A Goldfish?
Goldfish are an excellent subject for beginners. They have simple shapes and vibrant colors. Starting with a goldfish allows you to practice drawing curves and details without getting overwhelmed.
- Simple shapes make it easier to start.
- Vibrant colors make your drawing look lively.
- They help you practice curves and details.
Materials You’ll Need
Before you start drawing, gather all necessary materials. Here is a list of items you will need:
| Material | Description |
|---|---|
| Sketch Paper | Good quality paper for sketching. |
| Pencils | Different grades for shading and detailing. |
| Eraser | For correcting mistakes. |
| Colored Pencils or Markers | For adding color to your goldfish. |
| Reference Image | A clear picture of a goldfish. |
With these materials, you will be ready to start your goldfish drawing journey. Make sure to have everything on hand to avoid interruptions.

Credit: drawingmentor.com
Setting Up Your Workspace
Before you start drawing your goldfish, you need to set up your workspace. A well-organized area helps you focus and improves your drawing skills. Make sure you have all the necessary materials and a comfortable environment.
Choosing The Right Environment
Selecting the right environment is crucial for a successful drawing session. Choose a quiet place where you won’t be disturbed. Ensure good lighting to see your work clearly. Natural light is the best, but a good lamp works too.
| Factors | Details |
|---|---|
| Quietness | Avoid noisy areas to focus better. |
| Lighting | Use natural light or a bright lamp. |
| Comfort | Sit on a comfortable chair with good posture. |
Organizing Your Drawing Materials
Having your drawing materials organized can save you time and keep you inspired. Here is a list of materials you need:
- Pencils (HB, 2B, 4B)
- Eraser
- Sharpener
- Drawing paper
- Ruler
Arrange your materials within easy reach. Keep your pencils sharpened and your eraser clean. Use a clean sheet of paper to start your drawing.
Organize your workspace so you can focus on your goldfish drawing. A tidy area helps you stay motivated and creative. Happy drawing!
Understanding Goldfish Anatomy
Understanding goldfish anatomy is key to drawing an accurate and lively goldfish. Knowing the basic shapes and features helps in creating a realistic drawing. Let’s dive into the essential parts of goldfish anatomy to help you get started.
Basic Shapes In Goldfish Structure
Goldfish have simple shapes making up their bodies. The main body is an oval or egg shape. The head is a smaller oval attached to the body. The tail is a fan shape extending from the body.
The fins are triangle shapes. The dorsal fin is on top. The pectoral fins are near the head. The pelvic fins are under the body. The anal fin is near the tail.
| Body Part | Shape |
|---|---|
| Main Body | Oval |
| Head | Smaller Oval |
| Tail | Fan |
| Fins | Triangles |
Identifying Key Features
Key features of a goldfish make it unique. The eyes are large and round. Place them on either side of the head. The mouth is small and located at the front.
The scales cover the body. Draw small, overlapping circles to show scales. The tail fin is flowing and delicate. It gives the goldfish its graceful look.
- Large, round eyes
- Small mouth
- Overlapping scales
- Flowing tail fin
Highlighting these features will make your goldfish drawing come to life. Remember, each feature adds to the overall beauty of the goldfish.
Sketching The Basic Outline
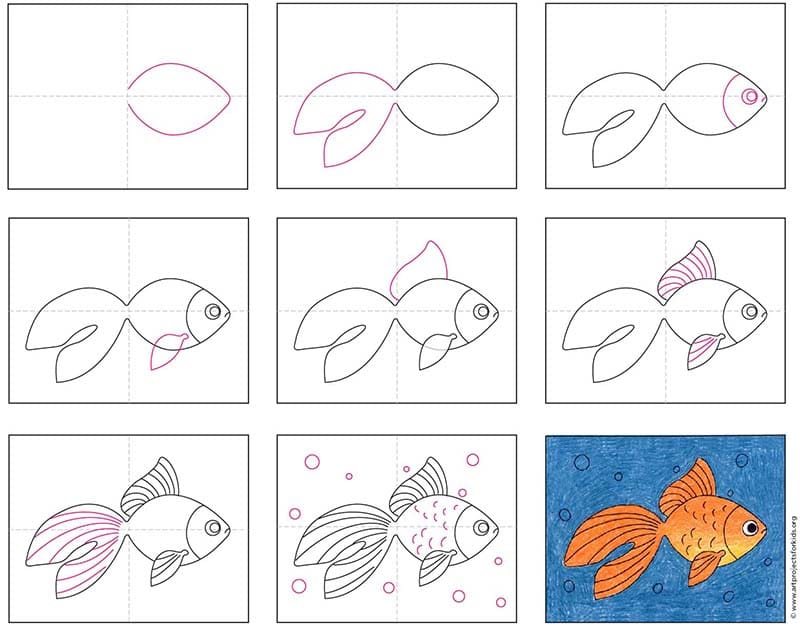
Learning to draw a goldfish can be fun and easy. Start with a basic outline. This will help you get the proportions right. Follow these steps to create a stunning goldfish drawing.
Starting With Simple Shapes
Begin by drawing a large oval for the goldfish’s body. This oval will be the main part of your goldfish. Next, draw a small circle at one end of the oval. This circle will be the goldfish’s head. Draw a curved line connecting the circle and the oval. This will form the goldfish’s neck.
Now, it’s time to add the fins. Draw two small triangles on each side of the oval. These triangles will be the pectoral fins. At the back of the oval, draw a larger triangle. This will be the tail fin.
Refining The Goldfish Silhouette
Next, refine the goldfish silhouette. Start by smoothing the connections between the shapes. Make the transitions between the body, head, and fins seamless. Add curves to the fins to give them a flowing look.
Pay attention to the tail fin. Goldfish tails are usually long and flowing. Extend the lines of the tail fin to create a more realistic look. Add some gentle curves and waves to the tail for a natural appearance.
Finally, erase the extra lines from the simple shapes. Now, you have a refined outline of your goldfish.
Adding Details To Your Goldfish
Adding details to your goldfish drawing brings it to life. These finer elements transform a simple sketch into a realistic masterpiece. By focusing on the eyes, fins, scales, and texture, you can create a stunning goldfish drawing.
Eyes And Fins
The eyes are crucial for your goldfish drawing. Start by drawing a small circle for the eye. Add a smaller circle inside for the pupil. Shade the pupil to give it depth. Place the eye near the head, slightly above the centerline.
The fins add grace to your goldfish. Draw the dorsal fin on the back. Make it look like a fan. Use curved lines to show movement. Add the pectoral fins near the sides. These should be smaller. Finally, draw the tail fin. Make it flowy and elegant.
Scales And Texture
Scales give your goldfish a realistic look. Start by drawing small, overlapping circles. These should cover the body. The scales near the head should be smaller. As you move toward the tail, make the scales larger.
Adding texture brings your drawing to life. Use short, curved lines to show the goldfish’s skin. Add these lines near the fins and around the body. This will make the goldfish look more three-dimensional.
For an extra touch, add some shading. Use light strokes to create shadows. This will make your goldfish look more realistic.
| Detail | Tips |
|---|---|
| Eyes | Draw a small circle with a shaded pupil. |
| Fins | Use curved lines for a flowing look. |
| Scales | Overlap small circles for a realistic effect. |
| Texture | Use short, curved lines to show skin. |
By following these steps, you will create a beautiful goldfish drawing. Pay attention to the details to make your goldfish look lifelike.

Credit: m.youtube.com
Shading And Coloring Techniques
Shading and coloring a goldfish bring your drawing to life. These techniques add depth and realism to your artwork. Let’s explore some effective methods to make your goldfish look vibrant and lifelike.
Creating Depth With Shading
Shading helps to create depth in your goldfish drawing. By using different pencil pressures, you can achieve varying shades of gray. Follow these steps:
- Identify the light source in your drawing.
- Shade the areas opposite to the light source.
- Use lighter strokes for lighter areas and darker strokes for shadows.
- Blend the shades smoothly with a blending stump.
Pay attention to the fins and scales. These parts need delicate shading to show their texture. Use a soft pencil for subtle shading and a hard pencil for darker areas.
Choosing Colors For Realism
Choosing the right colors makes your goldfish look real. Goldfish often have shades of orange, red, and yellow. Here’s how to select and apply colors:
- Start with a light orange base.
- Add red for shadows and depth.
- Use yellow to highlight certain areas.
- Blend the colors smoothly for a natural look.
Use colored pencils or watercolors for the best results. Always layer colors gradually. This gives a more realistic and vibrant appearance.
| Color | Usage |
|---|---|
| Light Orange | Base color for the body |
| Red | Shadows and depth |
| Yellow | Highlights |
Experiment with different color combinations. This helps you find the best look for your goldfish. Remember, practice makes perfect.
Final Touches To Bring Your Goldfish To Life
Adding the final touches to your goldfish drawing can bring it to life. These touches include adding highlights and shadows, and creating a background and environment. Let’s dive into these essential steps.
Highlights And Shadows
Highlights and shadows make your goldfish look three-dimensional. Use a white pencil or eraser to add highlights on the top of the goldfish. These highlights mimic light reflections. Draw shadows under the fins and on the lower part of the goldfish. Use a darker shade of the goldfish color.
Follow these steps for highlights and shadows:
- Add highlights on the top of the body.
- Draw shadows under the fins.
- Use a blending tool for smooth transitions.
Background And Environment
A simple background can make your goldfish stand out. You can draw an underwater scene with plants and bubbles. Use light blue for the water. Add some green plants to create an underwater feel. Bubbles can be drawn using small circles.
Consider these elements for the background:
| Element | Color |
|---|---|
| Water | Light Blue |
| Plants | Green |
| Bubbles | White |
Adding these details will make your goldfish drawing look amazing.
Tips To Improve Your Goldfish Drawings
Drawing a goldfish can be fun and rewarding. With some practice, your goldfish drawings will improve. Here are some tips to help you get better at drawing goldfish.
Practice Exercises
Practice is important for any skill. Try these exercises to enhance your goldfish drawings:
- Sketch Daily: Draw a goldfish every day. This builds your skill and confidence.
- Focus on Details: Pay attention to the fins and scales. This adds realism to your drawings.
- Use References: Look at real goldfish or photos. This helps you understand their shapes and colors.
These exercises will help you practice and improve steadily.
Learning From Mistakes
Mistakes are a part of learning. They help you get better. Here are some tips to learn from your mistakes:
- Review Your Work: Look at your drawings critically. Spot areas that need improvement.
- Seek Feedback: Ask friends or teachers for their opinions. They can provide valuable insights.
- Make Adjustments: Correct your mistakes in future drawings. This shows your progress.
By learning from your mistakes, you will see a big improvement in your goldfish drawings.
Credit: artprojectsforkids.org
Conclusion
Creating a goldfish drawing is a rewarding experience. With practice, your skills will improve. Follow the steps, use your creativity, and enjoy the process. Share your artwork with others to inspire them. Remember, patience and practice are key. Happy drawing!